Registrations
We now manually approve all new user accounts due to a large influx of spam bots. Accounts are normally approved within 48 hours.
If you need any help with using this Wiki, please ask here: TalkFord.com Wiki Submission Forum
Difference between revisions of "Vinyl Wrapping Steering Wheel Spokes"
(New page: ='''Vinyl Wrapping Steering Wheel Spokes'''= MK3 Mondeos suffer from particularly bad wear on the steering wheel spokes so at some point you’re going to want to refurb/mod them. Somebo...) |
(→Vinyl Wrapping Steering Wheel Spokes) |
||
| Line 1: | Line 1: | ||
| − | + | MK3 Mondeos (and no doubt many other cars) suffer from particularly bad wear on the steering wheel spokes so at some point you’re going to want to refurb/mod them. Somebody had tried to polish mine and made them much worse! | |
| − | + | ||
| − | MK3 Mondeos suffer from particularly bad wear on the steering wheel spokes so at some point you’re going to want to refurb/mod them. Somebody had tried to polish mine and made them much worse! | + | |
| Line 14: | Line 12: | ||
== So what are you going to need? == | == So what are you going to need? == | ||
| − | 1. '''Vinyl''' (Obviously) - Just ordinary sign-writers vinyl. This is readily available on eBay etc. I bought a square metre but a couple of A4 sized pieces will be plenty. Personally I liked the OEM look and went for a silver that very closely matched the original Ford paint – Avery 546 EF Gloss Silver. You could use any colour or finish you like, results should be the same! | + | 1. '''Vinyl''' (Obviously) - Just ordinary sign-writers vinyl. This is readily available on eBay etc. I bought a square metre but a couple of A4 sized pieces will be plenty. Personally I liked the OEM look and went for a silver that very closely matched the original Ford paint – ''Avery 546 EF Gloss Silver''. You could use any colour or finish you like, results should be the same! |
2. '''Some way of removing the spokes''' – I used a couple of plastic tyre leavers; the kind used for pedal cycles. If you don’t have these they’re worth investing in, a set should set you back less than a couple of quid. You could use a screwdriver if you think it’s worth the risk but if you slip you could do a lot of damage! I haven’t actually tried but I’d imagine the tools used to open iPods would also work quite well. | 2. '''Some way of removing the spokes''' – I used a couple of plastic tyre leavers; the kind used for pedal cycles. If you don’t have these they’re worth investing in, a set should set you back less than a couple of quid. You could use a screwdriver if you think it’s worth the risk but if you slip you could do a lot of damage! I haven’t actually tried but I’d imagine the tools used to open iPods would also work quite well. | ||
3. '''Very sharp scissors and the sharpest knife you can lay your hands on''' | 3. '''Very sharp scissors and the sharpest knife you can lay your hands on''' | ||
| − | 4. A hairdryer – most women have these and will usually loan them to you as long as you promise to return them, if you don’t know any women stop modding your car and get out a bit more. | + | |
| + | 4. '''A hairdryer''' – most women have these and will usually loan them to you as long as you promise to return them, if you don’t know any women stop modding your car and get out a bit more. | ||
5. '''Glasses''' - but only if you normally need them for detailed close-up work. | 5. '''Glasses''' - but only if you normally need them for detailed close-up work. | ||
| Line 27: | Line 26: | ||
[[Image:VinylWrap02.jpg]] | [[Image:VinylWrap02.jpg]] | ||
| + | |||
| + | |||
| + | == Step 1 – Removing the Spokes == | ||
| + | |||
| + | I was expecting this to be quite difficult and was convinced that I’d break at least one of them doing this. In actual fact they’re very robust and come off quite easily. | ||
| + | All you actually have to do is wedge something into the joint between the front and back parts and lever them apart. If you’ve inserted into the top joint then lever up, if you’ve inserted into the bottom joint, you guessed it, lever down. | ||
| + | |||
| + | |||
| + | [[Image:VinylWrap03.jpg]] | ||
| + | |||
| + | |||
| + | Without a lot of effort the joint will just open up. I found that squeezing front to back opened the gap up a little and allowed the lever in more easily. | ||
| + | |||
| + | |||
| + | [[Image:VinylWrap04.jpg]] | ||
| + | |||
| + | |||
| + | Once you’ve popped one side off, the other side is pretty easy, I used the lever for the first one but didn’t bother with the other three, I just flexed the plastic until the two parts popped apart. | ||
| + | Once they separate, the back part should just come free, the fronts are hooked behind the front of the wheel. Just lift the outside edge and pull away from the centre of the wheel. At this point I’d label the parts to make reassembly easier. | ||
| + | |||
| + | |||
| + | |||
| + | == Step 2 – Preparing the Spokes == | ||
| + | |||
| + | This stage isn’t entirely necessary but it will lead to better results. | ||
| + | The plastic itself is of fairly good quality but the moulding isn’t so much, there are a few sharp edges etc. I took these off with some fine sandpaper. You don’t need to go mad, just take of anything that could penetrate the vinyl and round off the harshest of the corners. This will of course affect the paint so if you want to be able go back to standard in the future you’ll have to make do and just be more careful when applying the vinyl. My advice would perhaps be to have a go at applying vinyl to once spoke before doing this, then if you’re confident you can achieve a good result you can always peel it off and do it properly. | ||
| + | |||
| + | |||
| + | == Step 3 – Applying the Vinyl == | ||
| + | |||
| + | Firstly you need to cut a piece of vinyl roughly to size. You have two options here, you can either work out the shape you need and cut it out or, like I did, cut a square that’s bigger than you need and trim it once it’s partially applied. Personally I didn’t bother trying to get the shape in advance as you’d ultimately end up having to trim it any way. | ||
Revision as of 19:15, 5 August 2010
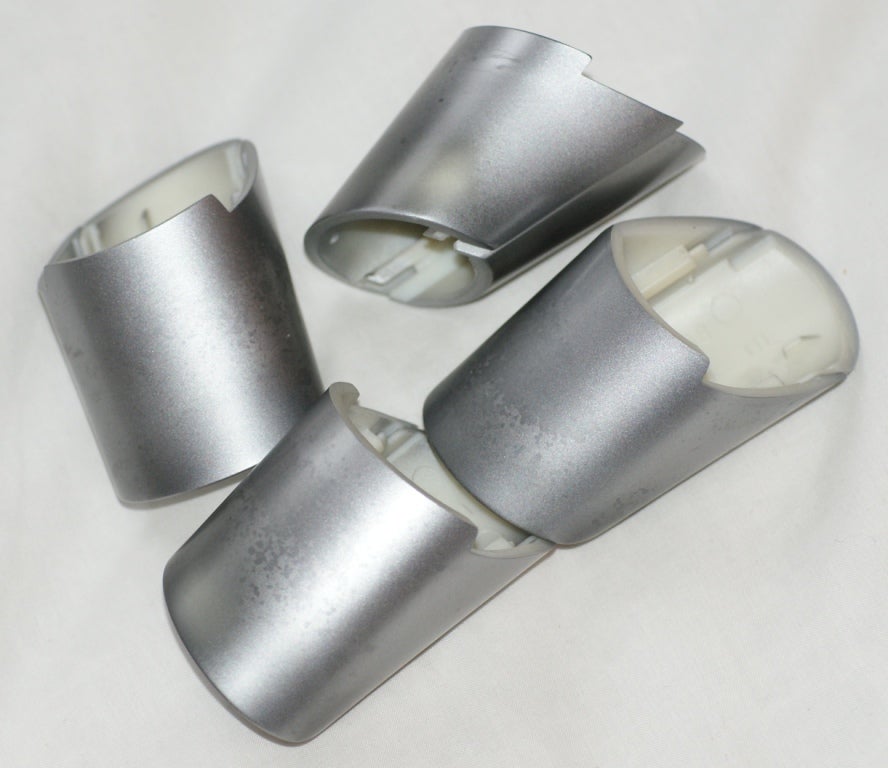
MK3 Mondeos (and no doubt many other cars) suffer from particularly bad wear on the steering wheel spokes so at some point you’re going to want to refurb/mod them. Somebody had tried to polish mine and made them much worse!
Basically you have 4 options; put up with them, replace them (very expensive), paint them (very time consuming) or vinyl-wrap them.
Vinyl –wrapping sounds very daunting but it’s really quite simple and produces very attractive results for very little expense – I bought enough vinyl to wrap about 20 sets of spokes for £5.
Contents
So what are you going to need?
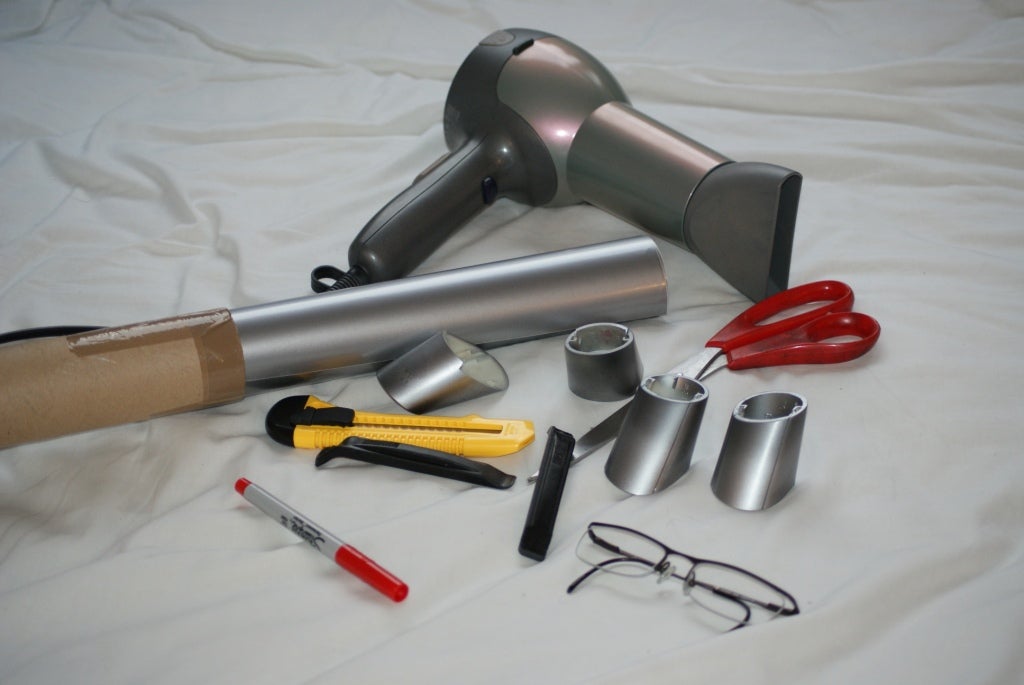
1. Vinyl (Obviously) - Just ordinary sign-writers vinyl. This is readily available on eBay etc. I bought a square metre but a couple of A4 sized pieces will be plenty. Personally I liked the OEM look and went for a silver that very closely matched the original Ford paint – Avery 546 EF Gloss Silver. You could use any colour or finish you like, results should be the same!
2. Some way of removing the spokes – I used a couple of plastic tyre leavers; the kind used for pedal cycles. If you don’t have these they’re worth investing in, a set should set you back less than a couple of quid. You could use a screwdriver if you think it’s worth the risk but if you slip you could do a lot of damage! I haven’t actually tried but I’d imagine the tools used to open iPods would also work quite well.
3. Very sharp scissors and the sharpest knife you can lay your hands on
4. A hairdryer – most women have these and will usually loan them to you as long as you promise to return them, if you don’t know any women stop modding your car and get out a bit more.
5. Glasses - but only if you normally need them for detailed close-up work.
6. A permanent marker – Not strictly necessary but I found it useful to label each the spokes as I took them off so I didn’t spend hours trying to work out which was which when reassembling the car.
Step 1 – Removing the Spokes
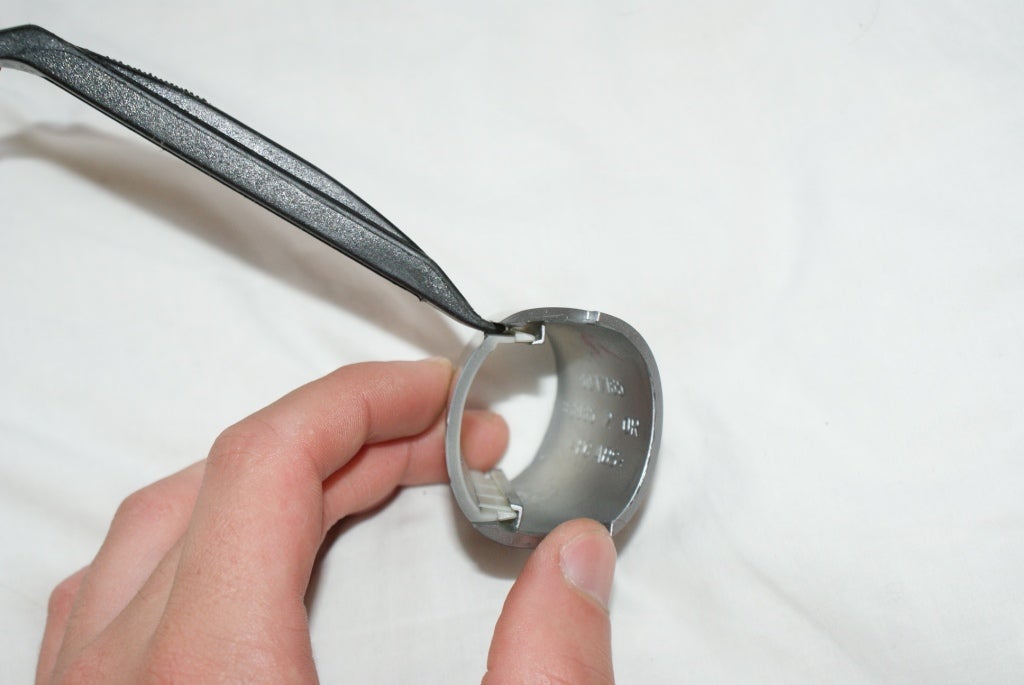
I was expecting this to be quite difficult and was convinced that I’d break at least one of them doing this. In actual fact they’re very robust and come off quite easily. All you actually have to do is wedge something into the joint between the front and back parts and lever them apart. If you’ve inserted into the top joint then lever up, if you’ve inserted into the bottom joint, you guessed it, lever down.
Without a lot of effort the joint will just open up. I found that squeezing front to back opened the gap up a little and allowed the lever in more easily.
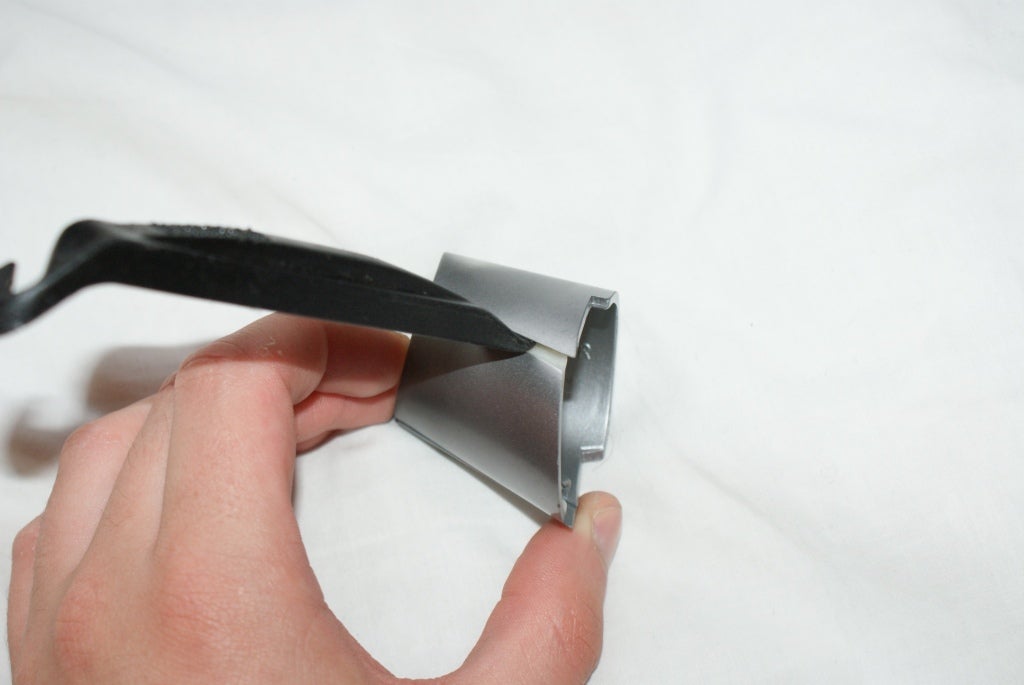
Once you’ve popped one side off, the other side is pretty easy, I used the lever for the first one but didn’t bother with the other three, I just flexed the plastic until the two parts popped apart.
Once they separate, the back part should just come free, the fronts are hooked behind the front of the wheel. Just lift the outside edge and pull away from the centre of the wheel. At this point I’d label the parts to make reassembly easier.
Step 2 – Preparing the Spokes
This stage isn’t entirely necessary but it will lead to better results. The plastic itself is of fairly good quality but the moulding isn’t so much, there are a few sharp edges etc. I took these off with some fine sandpaper. You don’t need to go mad, just take of anything that could penetrate the vinyl and round off the harshest of the corners. This will of course affect the paint so if you want to be able go back to standard in the future you’ll have to make do and just be more careful when applying the vinyl. My advice would perhaps be to have a go at applying vinyl to once spoke before doing this, then if you’re confident you can achieve a good result you can always peel it off and do it properly.
Step 3 – Applying the Vinyl
Firstly you need to cut a piece of vinyl roughly to size. You have two options here, you can either work out the shape you need and cut it out or, like I did, cut a square that’s bigger than you need and trim it once it’s partially applied. Personally I didn’t bother trying to get the shape in advance as you’d ultimately end up having to trim it any way.


 Your Privacy Choices