Registrations
We now manually approve all new user accounts due to a large influx of spam bots. Accounts are normally approved within 48 hours.
If you need any help with using this Wiki, please ask here: TalkFord.com Wiki Submission Forum
Difference between revisions of "Rear Wheel Bearing"
52graphite (Talk | contribs) |
52graphite (Talk | contribs) |
||
| Line 48: | Line 48: | ||
# Torque wrench. Bolt torque is important, and the hub bolts aren't the place to go guessing. | # Torque wrench. Bolt torque is important, and the hub bolts aren't the place to go guessing. | ||
# You'll probably also need a rubber or wooden mallet, or a hammer an a piece of wood. The disc and the hub are likely not to just drop off... | # You'll probably also need a rubber or wooden mallet, or a hammer an a piece of wood. The disc and the hub are likely not to just drop off... | ||
| − | # | + | # Adjustable spanner or long-handled 13mm spanner for the caliper bolts, plus a 13mm socket for your torque wrench. One of the bolts isn't accessible with a standard-size 13mm 1/2" drive socket, hence the spanner. |
| − | # | + | # Big screwdriver for use as a lever for the handbrake cable removal |
| + | # Molegrips or similar to grip the cable end for the handbrake cable removal | ||
Some tools shown below - 6" long 3/8" drive extension bar at the back, fronted by a T50 bit, E12 bolt from the SKF kit, E12 socket and a 3/8" to 1/2" adaptor for my 1/2" drive socket set and torque wrench. | Some tools shown below - 6" long 3/8" drive extension bar at the back, fronted by a T50 bit, E12 bolt from the SKF kit, E12 socket and a 3/8" to 1/2" adaptor for my 1/2" drive socket set and torque wrench. | ||
| Line 67: | Line 68: | ||
[[Image:Rwb-sensor.jpg]] | [[Image:Rwb-sensor.jpg]] | ||
| + | == Method == | ||
| − | ''' | + | '''Detailed instructions under construction''' |
| + | |||
| + | === Remove the wheel === | ||
| + | |||
| + | # Chock the front wheels. | ||
| + | # Put the transmission into first or reverse. | ||
| + | # Loosen the wheelnuts on the rear wheel slightly. | ||
| + | # Release the handbrake. | ||
| + | # Jack the car up at the [[Jacking Points|appropriate point]] and support with an axle stand. You're going to be applying a fair bit of force to the car, so ensure it's well supported. The single jacking and supporting point makes this tricky: you need to place the jack and stand close together. I leave both in place as a belt-and-braces approach. Don't try to do this job using just the car's standard jack. | ||
[[Category:Mondeo_Mk3]] | [[Category:Mondeo_Mk3]] | ||
[[Category:Mondeo_Mechanical]] | [[Category:Mondeo_Mechanical]] | ||
Revision as of 04:46, 21 December 2009
This is a draft.
This article applies to all Mk3 Mondeos. The part is common with Jaguar X-Type, so the instructions may work there, too - no promises.
Warning
It's worth getting a Haynes manual (Amazon: preface / facelift) despite having this guide, as you shouldn't go trusting your safety to some random community-editable resource you found on the internet. This should be treated as a clarification and expansion to the Haynes guide, not a replacement.
If you follow this guide, you're going to be working underneath a car that is jacked up with the handbrake off; and you're going to be replacing the bits that hold the rear wheels on. If you don't feel confident with that responsibility, get a qualified mechanic with insurance to do it.
As with all articles, the author, MEG and FordWiki accept no liability for injuries or damage incurred through following this article, or for inaccuracies therein.
Symptoms
A worn rear wheel bearing may show various symptoms:
- Play in the wheel: jack the car up and see if you can wobble the wheel side to side. There should be no play at all.
- Steady "thrum", maybe peaking at certain speeds and on certain surfaces
- Grinding noise, perhaps getting worse or better on corners as the weight distribution and lateral load changes
Make sure you're not misdiagnosing poor wheel balance or dodgy tyres. If you're at all uncertain, swap your wheels front-to-back and see if the noise remains.
What you'll need
Parts
The bearing itself is not available separately - you replace the entire hub assembly. References to "wheel bearing" below refer to the complete hub assembly.
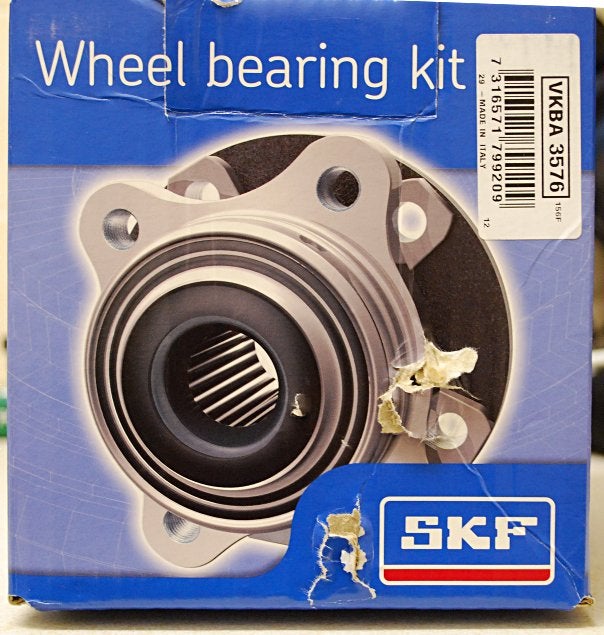
- A new wheel bearing. Your options here are: buy from your Ford dealer (expensive, around £200 per side); buy the same part elsewhere (SKF part VKBA 3576, can be found for around £100, try here; buy a cheaper pattern part (around £50); get a secondhand bearing.
- Bolts. The SKF kit comes with new bolts. Otherwise, re-use your old ones or preferably (as these are holding your rear wheels on) buy a set of 4 new ones per side from your Ford dealer (about 30p each). FINIS code?
I chose the SKF kit as it's the same as the OEM fit part which lasted well over 100k miles on my car. For the cost of a couple of tanks of petrol, I chose not to gamble with unknown bearings. Having said that, other MEGgers have fitted the cheap bearings and had months and thousands of miles of success. Your call.
Here's the SKF box - note that the picture on the box is a generic bearing picture, not the Mondeo bearing!
Tools
- Jack
- Axle stand
- Wheel chocks - you're working on a car with the handbrake off and the rear wheel jacked up. Don't take chances here.
- Wheel brace
- Long-reach Torx T50 bit. The bolts holding the hub to the car are accessed through a small hole (diameter 18mm). You'll need at least 3" of extension bar to get to it. 3/8" drive sockets should fit through the hole; 1/2" ones won't.
- If you use the bolts in the SKF kit, you'll need a Torx E12 socket - again, 3/8" with an extension. Halfords sell these. Although a 10mm standard socket fits an E12 bolt, don't be tempted to try to use this as you'll mess up the bolt and removal will be really difficult.
- Thread lock compound - SKF bolts are pre-treated with some blue gunk, otherwise apply your own.
- Torx T25 bit to undo the ABS sensor. Haynes recommends removing it, presumably to avoid damage, but it isn't necessary. If you do choose to remove it and your replacement has a different fastener, you'll need a tool for that too.
- Torque wrench. Bolt torque is important, and the hub bolts aren't the place to go guessing.
- You'll probably also need a rubber or wooden mallet, or a hammer an a piece of wood. The disc and the hub are likely not to just drop off...
- Adjustable spanner or long-handled 13mm spanner for the caliper bolts, plus a 13mm socket for your torque wrench. One of the bolts isn't accessible with a standard-size 13mm 1/2" drive socket, hence the spanner.
- Big screwdriver for use as a lever for the handbrake cable removal
- Molegrips or similar to grip the cable end for the handbrake cable removal
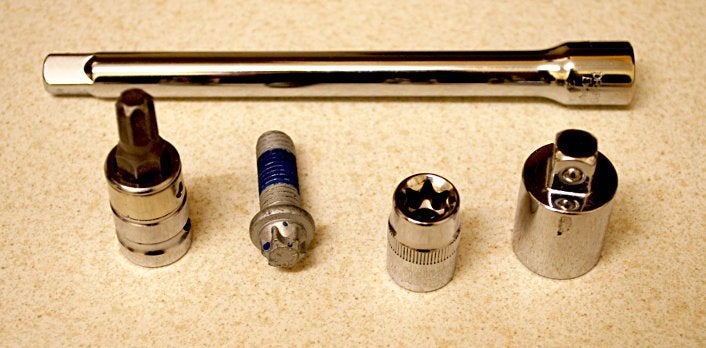
Some tools shown below - 6" long 3/8" drive extension bar at the back, fronted by a T50 bit, E12 bolt from the SKF kit, E12 socket and a 3/8" to 1/2" adaptor for my 1/2" drive socket set and torque wrench.
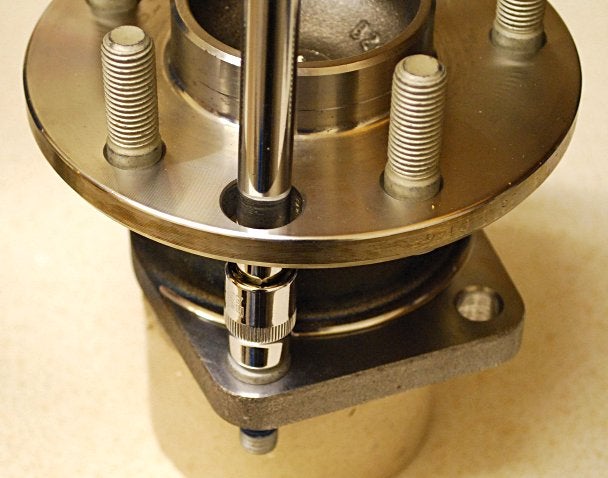
Here's how the bolt is accessed. My 6" bar is unnecessarily long - a 3" would be fine. The distance between the top faces of the two surfaces is 51mm.
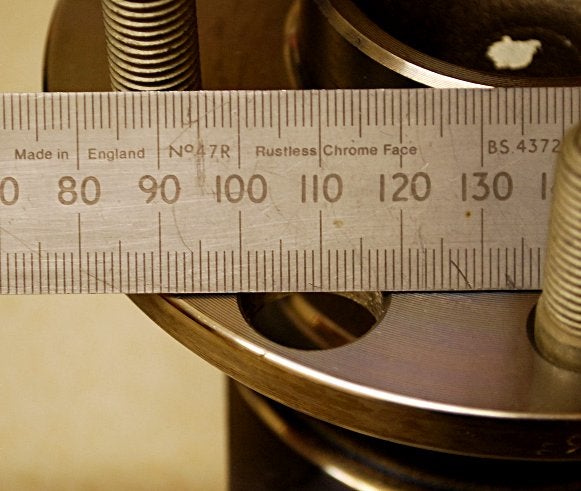
The access hole on the SKF hub (as factory-fitted) is 18mm diameter. The old hub's hole is likely to be smaller due to corrosion and gunk - you may need to clean it out a bit. Make sure your tools will fit through that.
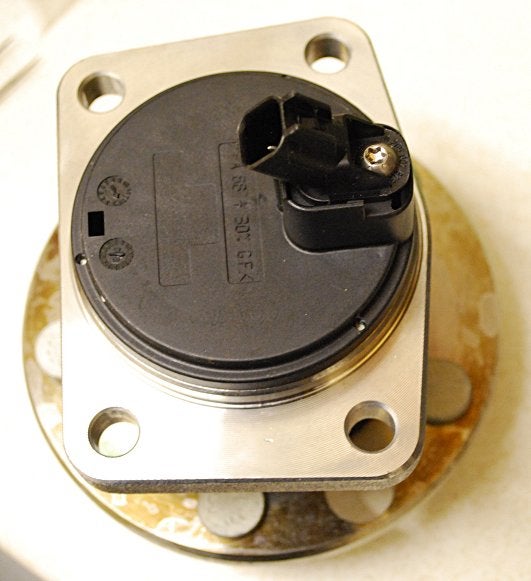
Here's the ABS sensor on the rear of the hub:
Method
Detailed instructions under construction
Remove the wheel
- Chock the front wheels.
- Put the transmission into first or reverse.
- Loosen the wheelnuts on the rear wheel slightly.
- Release the handbrake.
- Jack the car up at the appropriate point and support with an axle stand. You're going to be applying a fair bit of force to the car, so ensure it's well supported. The single jacking and supporting point makes this tricky: you need to place the jack and stand close together. I leave both in place as a belt-and-braces approach. Don't try to do this job using just the car's standard jack.
 Your Privacy Choices