Registrations
We now manually approve all new user accounts due to a large influx of spam bots. Accounts are normally approved within 48 hours.
If you need any help with using this Wiki, please ask here: TalkFord.com Wiki Submission Forum
Difference between revisions of "Door Cards - Removal"
52graphite (Talk | contribs) m |
|||
| (19 intermediate revisions by 5 users not shown) | |||
| Line 1: | Line 1: | ||
| + | {{note|'''The Ford Mondeo hit our roads in 1993, and has consistently been a sales success. Now on its 4th incarnation, it remains a drivers favourite.'''<br> | ||
| + | '''For more information, visit the [http://www.talkford.com/forum/596-mondeo/ Ford Mondeo] forum on [http://www.talkford.com TalkFord.com], the definitive resource site covering all Fords from the present day to the 1970's.'''}} | ||
| + | ---- | ||
| + | {{Infobox | ||
| + | |name = Infobox Template | ||
| + | |bodystyle = float:right; valign:top; | ||
| + | |image = [[File:Fordwiki infobox.png]] | ||
| + | |imagestyle = | ||
| + | |caption = Overview Guide | ||
| + | |captionstyle = | ||
| + | |headerstyle = background:#ccf; | ||
| + | |labelstyle = background:#ddf; | ||
| + | |datastyle = text-align:right; | ||
| + | |header1 = | ||
| + | |label1 = Ford Model: | ||
| + | |data1 = '''Mondeo''' | ||
| + | |header2 = | ||
| + | |label2 = Petrol/Diesel: | ||
| + | |data2 = '''Both''' | ||
| + | |header3 = | ||
| + | |label3 = Estimated Cost: | ||
| + | |data3 = '''Free''' | ||
| + | |header4 = | ||
| + | |label4 = Difficulty? | ||
| + | |data4 = '''Easy''' | ||
| + | |label5 = How long does this take? | ||
| + | |data5 = '''About 10 Mins per door''' | ||
| + | }} | ||
| + | |||
== Tools required == | == Tools required == | ||
* Sharp knife | * Sharp knife | ||
* Wide flat-blade screwdriver or similar tool | * Wide flat-blade screwdriver or similar tool | ||
| − | * Medium-sized Phillips-head screwdriver (cross-head, | + | * Medium-sized Phillips-head screwdriver (cross-head, No 2 size) |
| − | * Torx T25 driver | + | * Torx T27 driver, although most people may only have a T25 driver, which will work, but with a loose fit. |
== Method == | == Method == | ||
| − | + | * Remove the circular screw covers on mirror cover (fronts) and door handle recess using a sharp point (knife?). Be very careful not to lose them when they fly out, and take care not to mark the plastic. | |
| − | + | ||
| − | + | [[Image:remove-sail-cover.jpg]] | |
| − | + | ||
| − | + | Ignore the tweeter in this shot, and you may prefer to use two hands if you're not also holding a camera. If you can reach it, the tool needs to be inserted in the top right part of the plastic cover rather than in the position shown in the pic, as this may leave the cover scratched or damaged: | |
| − | + | ||
| − | + | [[Image:remove-cup-cover.jpg]] | |
| + | |||
| + | * (Fronts only) Remove Phillips screw from mirror cover and remove mirror cover. It is held in with a fairly strong spring clip at the top: just pull firmly and it'll come. | ||
| + | * Remove Torx screw (T27) from door handle recess. Once the screw is out, pull off the trim surrounding the door handle. This will be much easier if you 'pull' the door release handle into the open position, as it will give the piece more room to pass the handle. | ||
| + | |||
| + | * The door pull (the bit you put your fingers in to pull the door shut) is lined with a plastic L-shaped piece (bottom and "fingers-side") which needs to come out. Using a flat blade screwdriver or similar tool in the gap between the top right hand edge of the the door trim, carefully but firmly push it away from you to unclip it, then lift it out: | ||
| + | |||
| + | [[Image:remove-pull-lining.jpg]] | ||
| + | |||
| + | * Remove Phillips screws from door pull recess: 2 in front doors, 1 in rears. | ||
| + | * Remove Phillips screws from around the door: 6 on front doors and 4 on rears. | ||
| + | * Remove the door card by lifting it up and out. You'll need to remove the connector from the window switches - there's a locking tag to manipulate to get them to release. | ||
Window switches are clipped in from behind. If you remove them, make sure you get all clips to catch when re-fitting, as it is annoying to have to remove the door panel again when you haven't got one of them in and the switch starts dipping at the unsecured end. Also, don't forget to reconnect the electrical connector before re-fitting the door card. | Window switches are clipped in from behind. If you remove them, make sure you get all clips to catch when re-fitting, as it is annoying to have to remove the door panel again when you haven't got one of them in and the switch starts dipping at the unsecured end. Also, don't forget to reconnect the electrical connector before re-fitting the door card. | ||
| − | [[Category: | + | [[Category:Mondeo_Mk3]] |
| − | + | ||
Latest revision as of 16:35, 22 April 2011
For more information, visit the Ford Mondeo forum on TalkFord.com, the definitive resource site covering all Fords from the present day to the 1970's.
|
Overview Guide | |
| Ford Model: | Mondeo |
|---|---|
| Petrol/Diesel: | Both |
| Estimated Cost: | Free |
| Difficulty? | Easy |
| How long does this take? | About 10 Mins per door |
Tools required
- Sharp knife
- Wide flat-blade screwdriver or similar tool
- Medium-sized Phillips-head screwdriver (cross-head, No 2 size)
- Torx T27 driver, although most people may only have a T25 driver, which will work, but with a loose fit.
Method
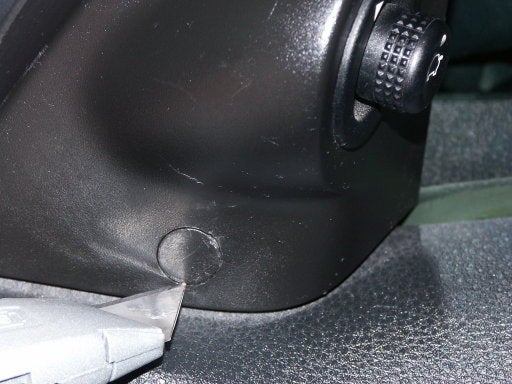
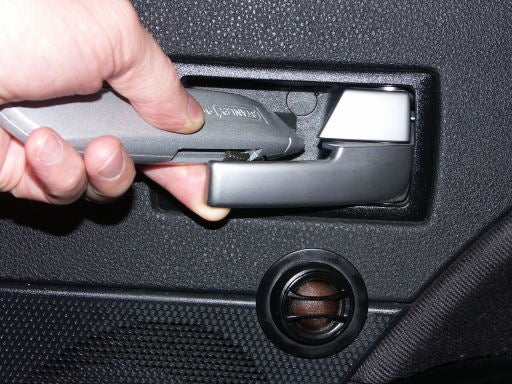
- Remove the circular screw covers on mirror cover (fronts) and door handle recess using a sharp point (knife?). Be very careful not to lose them when they fly out, and take care not to mark the plastic.
Ignore the tweeter in this shot, and you may prefer to use two hands if you're not also holding a camera. If you can reach it, the tool needs to be inserted in the top right part of the plastic cover rather than in the position shown in the pic, as this may leave the cover scratched or damaged:
- (Fronts only) Remove Phillips screw from mirror cover and remove mirror cover. It is held in with a fairly strong spring clip at the top: just pull firmly and it'll come.
- Remove Torx screw (T27) from door handle recess. Once the screw is out, pull off the trim surrounding the door handle. This will be much easier if you 'pull' the door release handle into the open position, as it will give the piece more room to pass the handle.
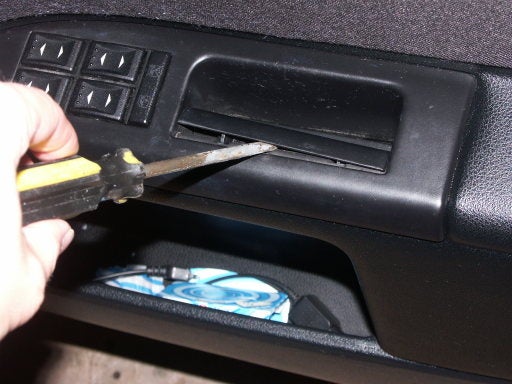
- The door pull (the bit you put your fingers in to pull the door shut) is lined with a plastic L-shaped piece (bottom and "fingers-side") which needs to come out. Using a flat blade screwdriver or similar tool in the gap between the top right hand edge of the the door trim, carefully but firmly push it away from you to unclip it, then lift it out:
- Remove Phillips screws from door pull recess: 2 in front doors, 1 in rears.
- Remove Phillips screws from around the door: 6 on front doors and 4 on rears.
- Remove the door card by lifting it up and out. You'll need to remove the connector from the window switches - there's a locking tag to manipulate to get them to release.
Window switches are clipped in from behind. If you remove them, make sure you get all clips to catch when re-fitting, as it is annoying to have to remove the door panel again when you haven't got one of them in and the switch starts dipping at the unsecured end. Also, don't forget to reconnect the electrical connector before re-fitting the door card.


 Your Privacy Choices