Registrations
We now manually approve all new user accounts due to a large influx of spam bots. Accounts are normally approved within 48 hours.
If you need any help with using this Wiki, please ask here: TalkFord.com Wiki Submission Forum
Difference between revisions of "Dash LCD Colour - How to Change"
m (V6AlternatorRemoval moved to How to Change Dash LCD Colour) |
|||
| Line 1: | Line 1: | ||
| − | == | + | ==How to Change Dash LCD Colour== |
===Instructions=== | ===Instructions=== | ||
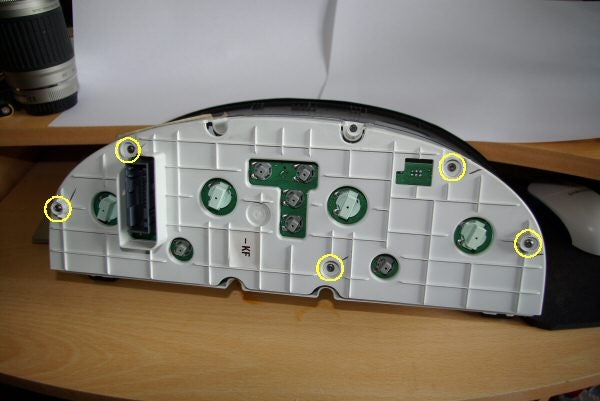
| − | + | First of all remove the instrument cluster, and remove the 5 torx screws as highlighted. | |
| − | + | [[Image:5torx.jpg]] | |
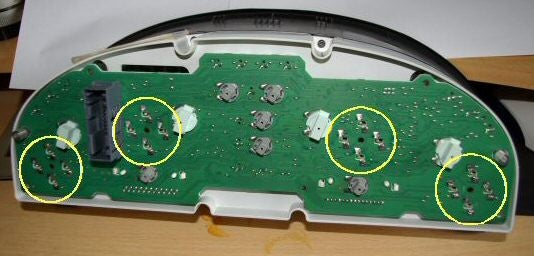
| − | + | The circuit board needs to be gently pulled off now. This is held on to the gauge stepper motors with clips (4 clips per stepper motor). Don't try to pull on one side only, pull a little on each one till the board is free. | |
| − | + | [[Image:4clips.jpg]] | |
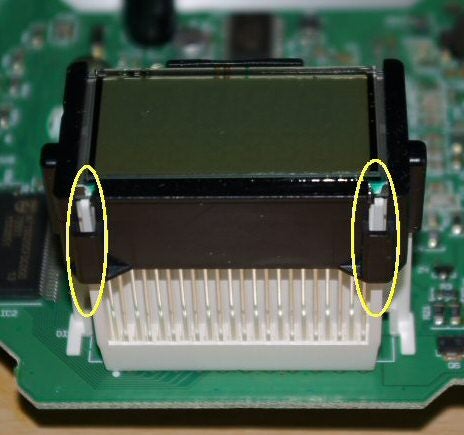
| − | + | The black bezel around the LCD needs to be removed. This is held on by 4 clips, the two on the bottom of the LCD should be unclipped first. Use a small flatblade screwdriver to prise the black plastic away from the white moulding, taking care not to put any pressure on the pins holding the LCD to the circuit board, or on the glass panel itself. Then unclip the two on the top (much easier) | |
| − | [[Category: | + | [[Image:Unclipbezel.jpg]] |
| − | [[Category: | + | |
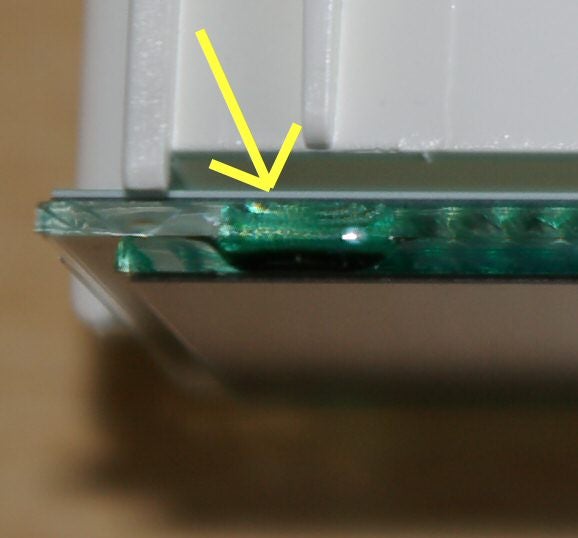
| + | Once the bezel is off, *VERY* gently prise the LCD forwards, and you will see the filter stuck onto the back of the LCD panel. Using a knife carefully free the filter away fron the LCD and remove. I found on mine that it was only held on by a little piece of sticky tape on each edge. I can't stress enough, do not pull the LCD too far forwards (only enough to get your knife blade behind) or you will damage the pins on the LCD itself! | ||
| + | |||
| + | [[Image:Removelcd.jpg]] | ||
| + | |||
| + | Now comes the boring part...removing the old diffuser and green filter paint. The back of the filter needs to be rubbed down, to the bare white plastic. Make sure you don't rub down the silver side, that part will be visible from the front! | ||
| + | I decided to use solvent cleaner rather than sandpaper to do this, to avoid any scratches showing up when lit. Here is what it looked like after a bit of hard graft (it does take quite a bit of rubbing) Note that quite a bit of diffuser paint will come off first, before you actually get to see the green bit. | ||
| + | |||
| + | [[Image:Paint.jpg]] | ||
| + | |||
| + | Once it's down to the bare white plastic, you can stick on the colour of your choice. I used stick on filter from these guys (i got the translucent film) | ||
| + | |||
| + | http://www.metal-monkey.co.uk/acatalog/Coloured_Gels___Films.html | ||
| + | |||
| + | Once the new filter is on, re-assemble and admire your new colourful dials. | ||
| + | One more thing worth noting, is that this procedure can also be used to change the backlight of the dials too | ||
| + | |||
| + | Daz | ||
| + | |||
| + | [[Category:Electrical]] | ||
| + | [[Category:Mk3]] | ||
| + | [[Category:Tips]] | ||
Revision as of 18:42, 13 June 2007
How to Change Dash LCD Colour
Instructions
First of all remove the instrument cluster, and remove the 5 torx screws as highlighted.
The circuit board needs to be gently pulled off now. This is held on to the gauge stepper motors with clips (4 clips per stepper motor). Don't try to pull on one side only, pull a little on each one till the board is free.
The black bezel around the LCD needs to be removed. This is held on by 4 clips, the two on the bottom of the LCD should be unclipped first. Use a small flatblade screwdriver to prise the black plastic away from the white moulding, taking care not to put any pressure on the pins holding the LCD to the circuit board, or on the glass panel itself. Then unclip the two on the top (much easier)
Once the bezel is off, *VERY* gently prise the LCD forwards, and you will see the filter stuck onto the back of the LCD panel. Using a knife carefully free the filter away fron the LCD and remove. I found on mine that it was only held on by a little piece of sticky tape on each edge. I can't stress enough, do not pull the LCD too far forwards (only enough to get your knife blade behind) or you will damage the pins on the LCD itself!
Now comes the boring part...removing the old diffuser and green filter paint. The back of the filter needs to be rubbed down, to the bare white plastic. Make sure you don't rub down the silver side, that part will be visible from the front! I decided to use solvent cleaner rather than sandpaper to do this, to avoid any scratches showing up when lit. Here is what it looked like after a bit of hard graft (it does take quite a bit of rubbing) Note that quite a bit of diffuser paint will come off first, before you actually get to see the green bit.
Once it's down to the bare white plastic, you can stick on the colour of your choice. I used stick on filter from these guys (i got the translucent film)
http://www.metal-monkey.co.uk/acatalog/Coloured_Gels___Films.html
Once the new filter is on, re-assemble and admire your new colourful dials. One more thing worth noting, is that this procedure can also be used to change the backlight of the dials too
Daz


 Your Privacy Choices