Registrations
We now manually approve all new user accounts due to a large influx of spam bots. Accounts are normally approved within 48 hours.
If you need any help with using this Wiki, please ask here: TalkFord.com Wiki Submission Forum
Xenon OEM Headlight Retro-fit Guide
For more information, visit the Ford Mondeo forum on TalkFord.com, the definitive resource site covering all Fords from the present day to the 1970's.
|
Overview Guide | |
| Ford Model: | Mondeo |
|---|---|
| Petrol/Diesel: | Both |
| Estimated Cost: | ???? |
| Difficulty? | Easy Skills but good with elecrics |
| How long does this take? | 3 Hrs |
I have recently performed the relatively simple task of upgrading the Mondeo from ordinary halogen headlights to the OEM Xenon HID headlights.
Contents
Wiring Diagrams
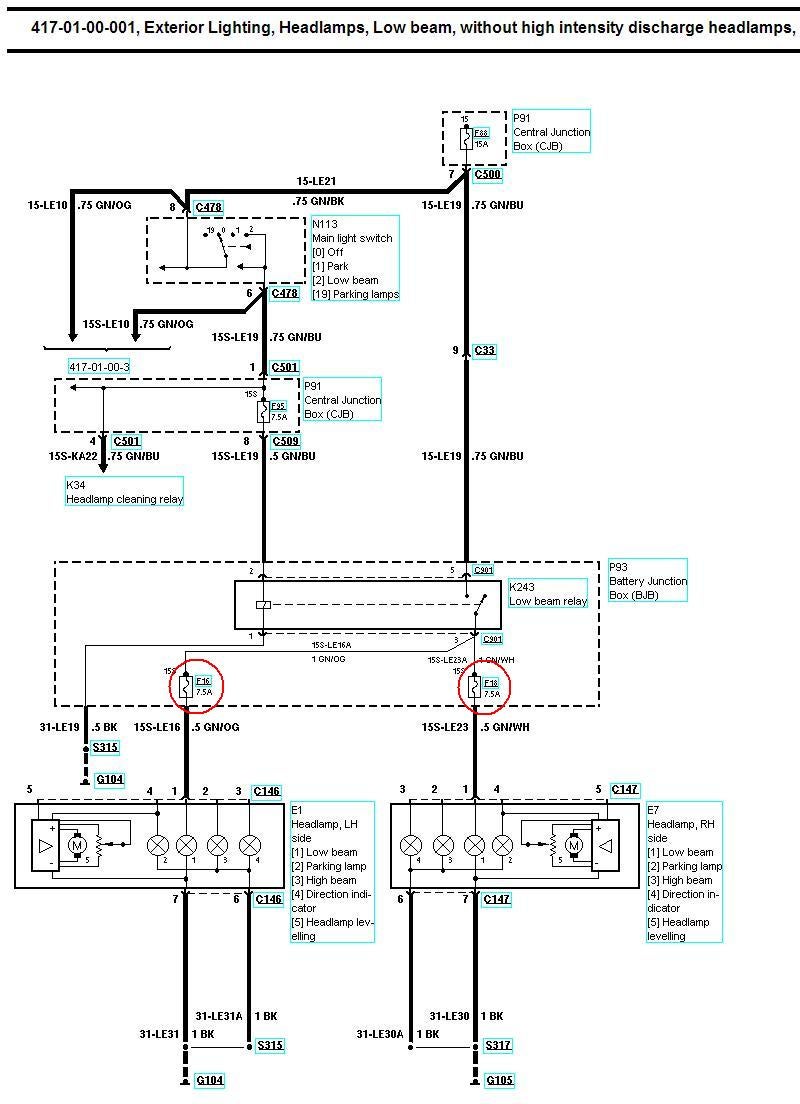
The wiring diagrams for the halogen headlights are pretty simple, and show the connections to and from each of the pins on the 7-pin headlight connectors (C146 & C147):
It is worth noting that the 7.5A Fuses 16 and 18 (highlighted in red) have to be upgraded to 20A to support the xenon lights.
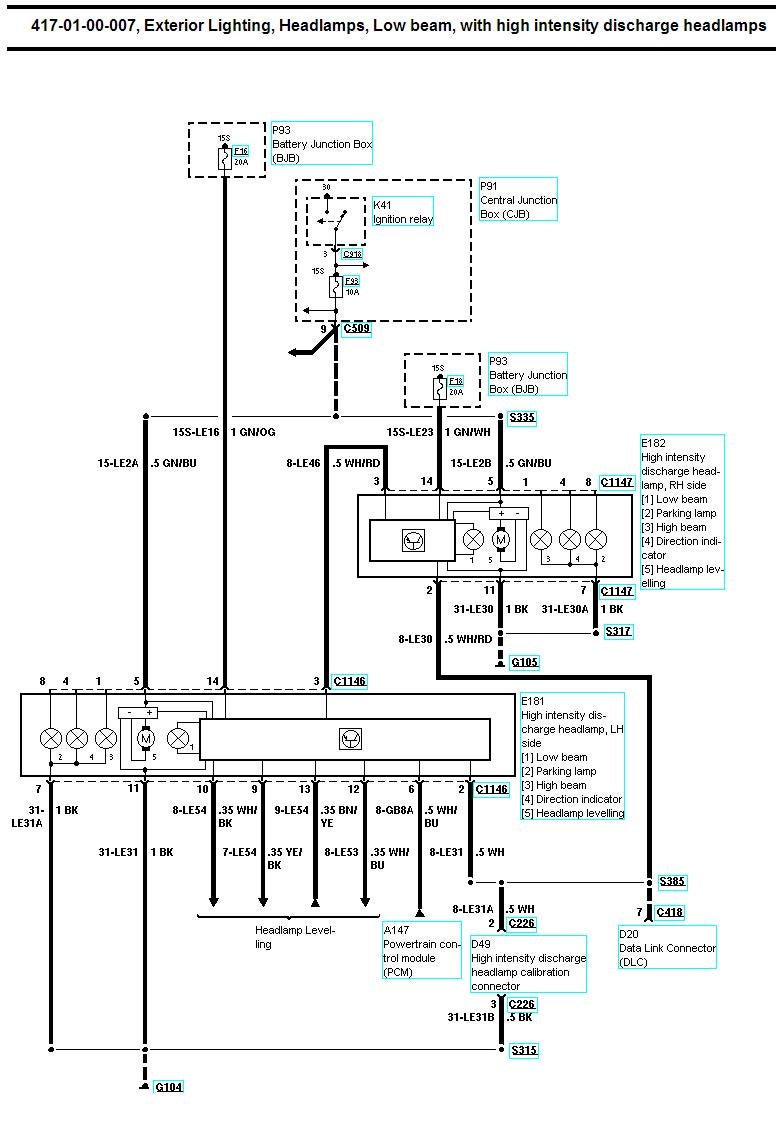
The wiring diagram for the Xenon HID headlights is a lot more complicated, but we only need very few details from it. Again, it shows the connections to and from each of the headlight connectors:
As you can see, there are a lot more wires going to the xenon headlights, most of these are for the automatic levelling system, which connects to sensors in the axles of the car to ensure the xenon lights remain aimed properly (to aviod blinding oncoming drivers). To get the xenons to work, most of these can be ignored. The manual headlight level adjuster can be used to adjust the xenons from inside the car instead.
Headlight Connectors
PLEASE NOTE: Although it is possible to connect your lights to the existing wiring loom, it is strongly reccomended to split the live feed to the battery to allow for a more stable power feed. Do this by creating a fused (20a) feed from the battery to a relay for each headlamp.
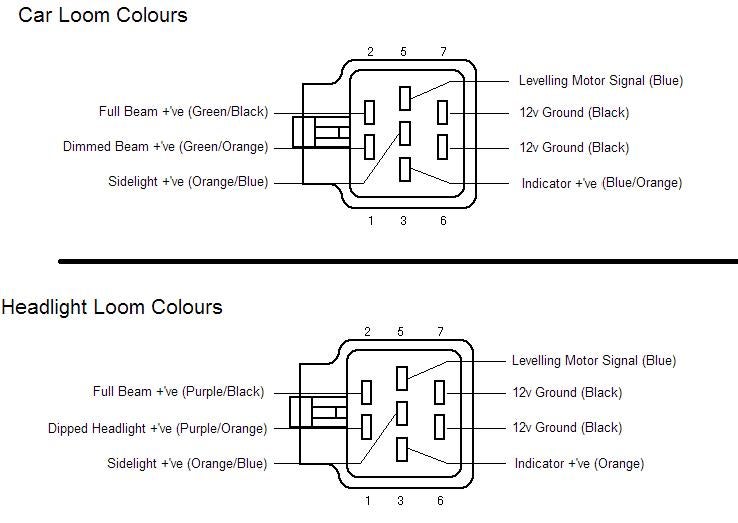
The halogen headlights have a white male connector built into the rear of the light unit, and the car's loom plugs straight into this with a balck female connector. As you can see, different colours of wiring are used on the car loom and inside the headlight. Both are shown below:
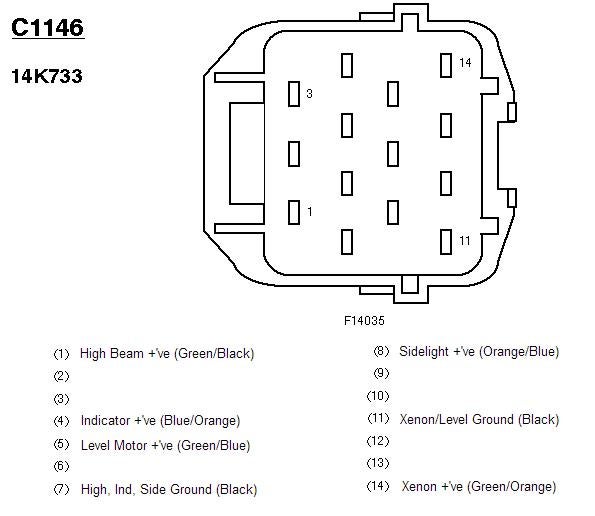
The xenon connector for the Left (N/S) headlight is shown below, with only the wires required to get the xenons working labelled:
Conversion Loom
I cut the wiring from the inside of an old halogen headlight unit (bought from scrap yard for £5 as the lens was broken) as I didn't want to start butchering the car's loom. This left me with the white male connector with a good 6 inches of wiring going to each pin.
I then cut the connector off the xenon headlight (this is an expensive point of no return) and joined the relevent wires to those connected to the halogen male connector, using ordinary 15A connector blocks.
I was then left with a xenon headlight with a halogen connector, ready to plug into the car's existing loom. The advantage of this method is that the xenons can easily be swapped back to your ordinary halogen headlights in a matter of minutes.
It is also possible to create a loom from scratch going between the existing connectors using small spade connectors that are filed down.
Materials Required
- Pair Mondeo (2000>) Xenon Headlights (eBay is best bet for these).
- 2x Mondeo (2000>) Halogen Headlights (broken ones from scrap yard, as all you want is the connector)
- 14x Connector Blocks (15A)
- Lots of black electrical tape
- Wire Cutters
- Wire Strippers
- Flat Screwdriver
Hope this helps, photos to follow!
Submitted by dazedconfused
Excellent descriptive post that works a treat,however...on the early 00-04 headlamps,the wiring schemes are different to the colours listed so check pin outs rather than colours.
Also.. if you remove the rear cover of each hid lamp exposing the lamp bases and wiring inside the unit,you will see 3 wires running to each aim motor.
black is obviously earth. blue is aim adjust feed from the multi plug on the back of the hid ballast purple/yellow is sidelight 12v trigger.
This is the same wiring config as your old removed lamp [check if you need to ;-))]
my lamps would not work with the wiring pin outs as above as the blue aim motor feed went onto a white/red lamp wire which is spliced with the purple/yellow trigger wire leaving no blue feed from the hid ballast.
a 2 minute rework allowing your blue feed to go to hid ballast blue and your second sidelight feed purple/yellow to go to aim motor purple/yellow corrects this wiring anomoly which leaves you without aim adjust if left untouched.
Extra info by Col_Tubbs Mar'10
I’ve recently done another set of these for converting to halogen connections, this time I had the ends of the xenon car loom as well. So I was making the small patch loom for both sides, and found that I was only remaking 2 connections in each unit for the levelling motors to work.
These were the power from the sidelight & the signal wire for the adjustment control. The power splits off to give some 12v feed to the ballast, this was cut and the signal wire was also cut from the ballast. I used one of the now spare wires in the loom to take the signal connection down to the conversion loom.
I made sure that all of the connections worked before closing up the unit, with doing this way, I am able to undo what I have done to increases the resale value for later.
All other wires were not touched. There is confusion in the wiring colours from the car loom & the headlamp loom so be very careful. Also the LH unit has more wires going to it that the RH unit, also there is yet again a difference in the wiring colours, so you have been warned.
All you now see from the looms are the power connections for the xenon’s and the old headlight dip beam connections which now provide the signal connection to the main relay which now powers the xenon’s. Also the headlamp fuses are back to the orginal 7.5 amp not 20 as discribed in the text/drawings above.
Picture of Off Side Hid conversion loom.
Extra levelling motor connection info by Howard Canning
I noticed that a few people were a little confused by the levelling system when doing their HID retrofits, so I decided to place the relevant portion of my experiences/tutorial thread here, in the hope that it will appear nice and clear to anyone wishing to undertake this!
So remove the rear cover from your headlamp (carefully so as not to break any of the lugs - more on this later. There's two hex screws and a clip, and then it unhinges from one end), and remove the two hex screws from the motor (the grey rectangular piece, with PP-GF30 stamped on the top). Now carefully remove the screw connecting the motor shaft assembly to the raised section of the lens.
The motor should now be free enough for you to remove the 3-pin connector from its underside.
In a nutshell, you need to:
- Provide power to the motor. Of the three cables, this is the multicoloured one - purple/orange, I believe.
- Provide the signal feed which adjusts the motor - this is done by the voltage varying when you turn the wheel on the dashboard. Of the three cables, this is the blue one.
- Ground the motor. This will of course already be done. No changes required.
Power: In the Halogen system, the motor's permanent live (power) feed is provided by the side-light feed. I simply cut the cable inside the headlamp going to the side-light bulb, and spliced in the motor's power feed cable. Not too difficult.
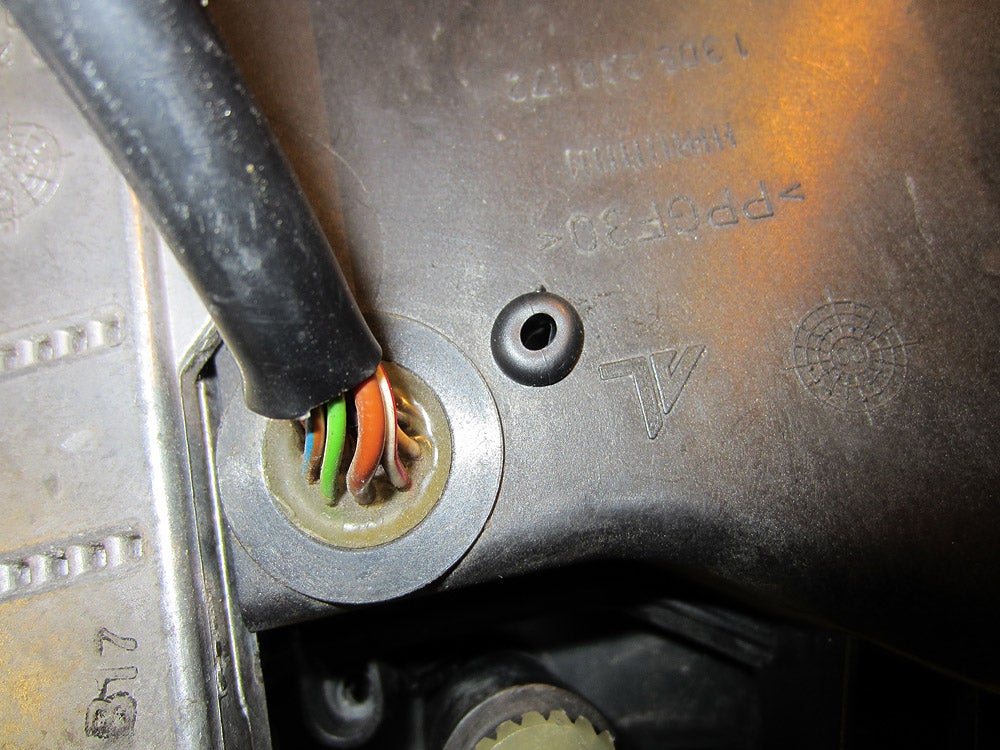
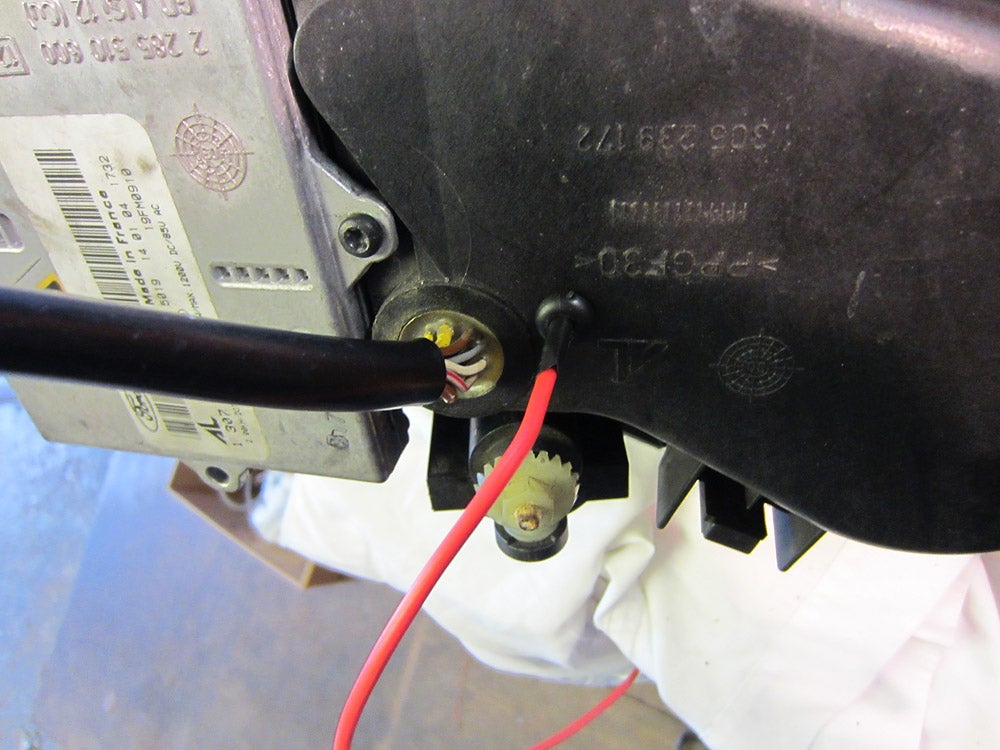
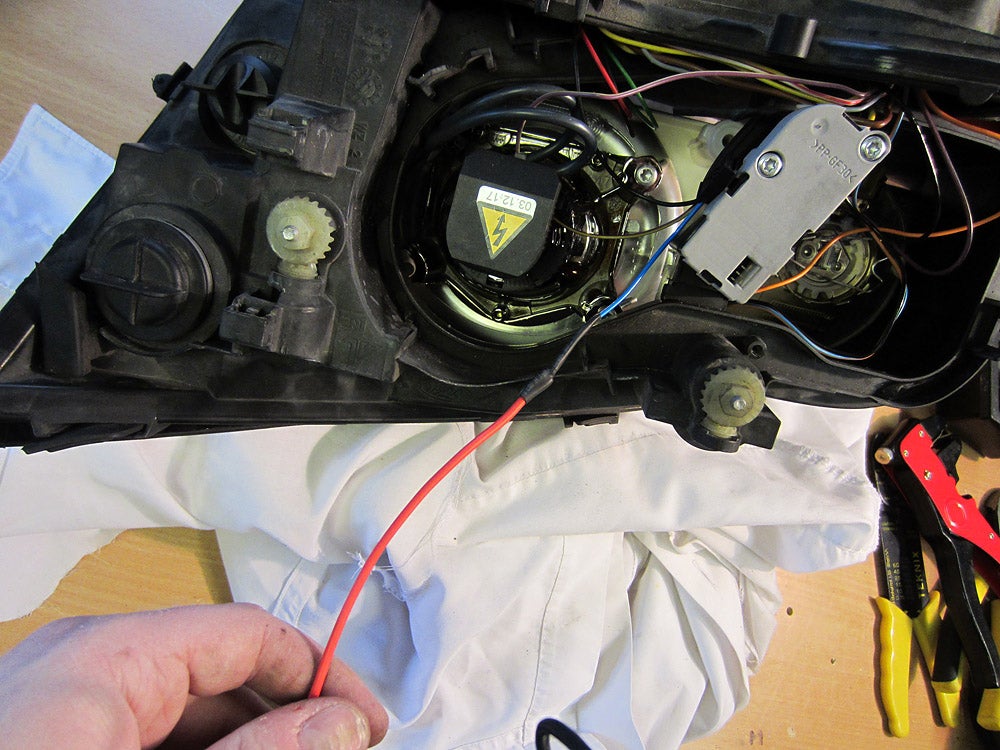
Signal: This is the important bit, if you want the motors to move. In the Xenon headlamps, this comes from the ballast, as the ballasts contain the self-levelling control circuitry. We want to bypass this, so what I did was to cut the blue wire, extend it and pass it out through the rear of the headlamp.
I am a fan of doing things neatly and properly, so I obtained some tiny little grommets and made a neat job of it:
And the cable from the motor:
Now you simply need to join this wire to the 'level' feed from the Halogen wiring loom. On my halogen patch loom, this was the blue wire. I used a terminal block to connect the two wires, as I wanted to be able to easily remove the headlamps from the car if need be. Using bullet crimp connectors is probably better, though.
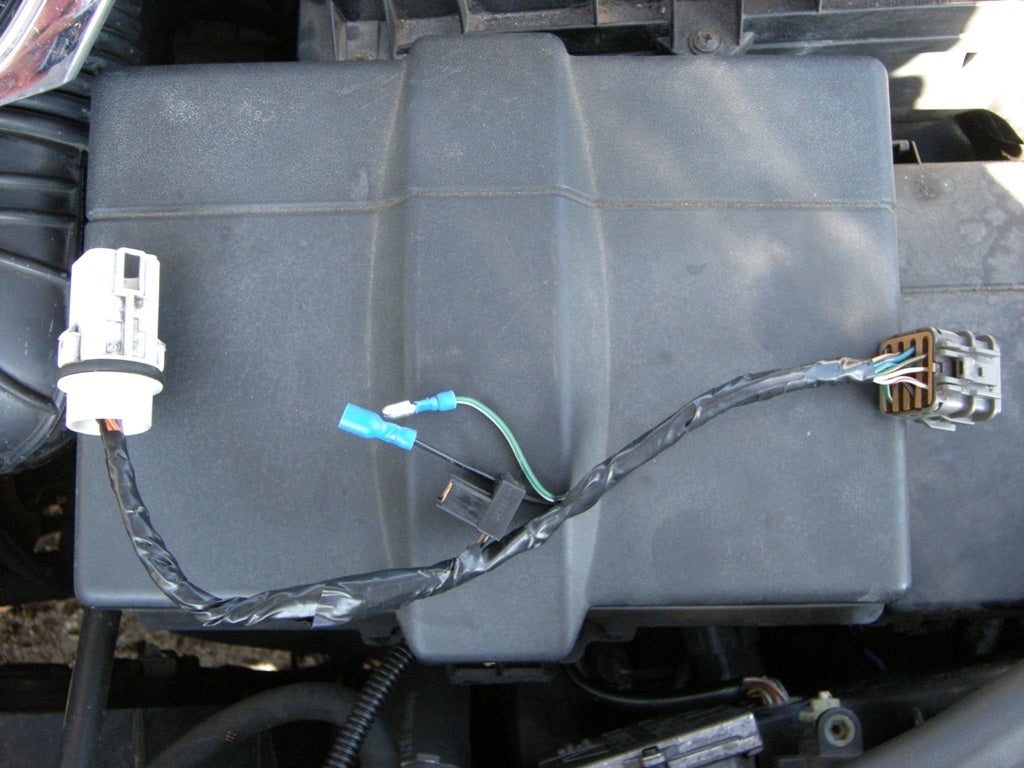
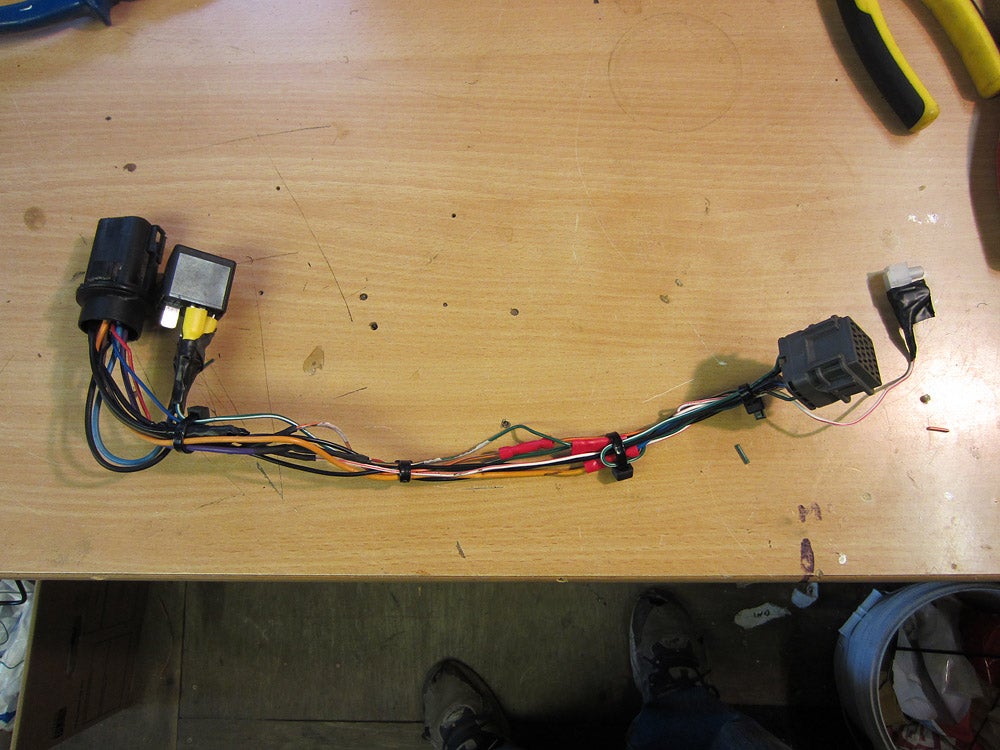
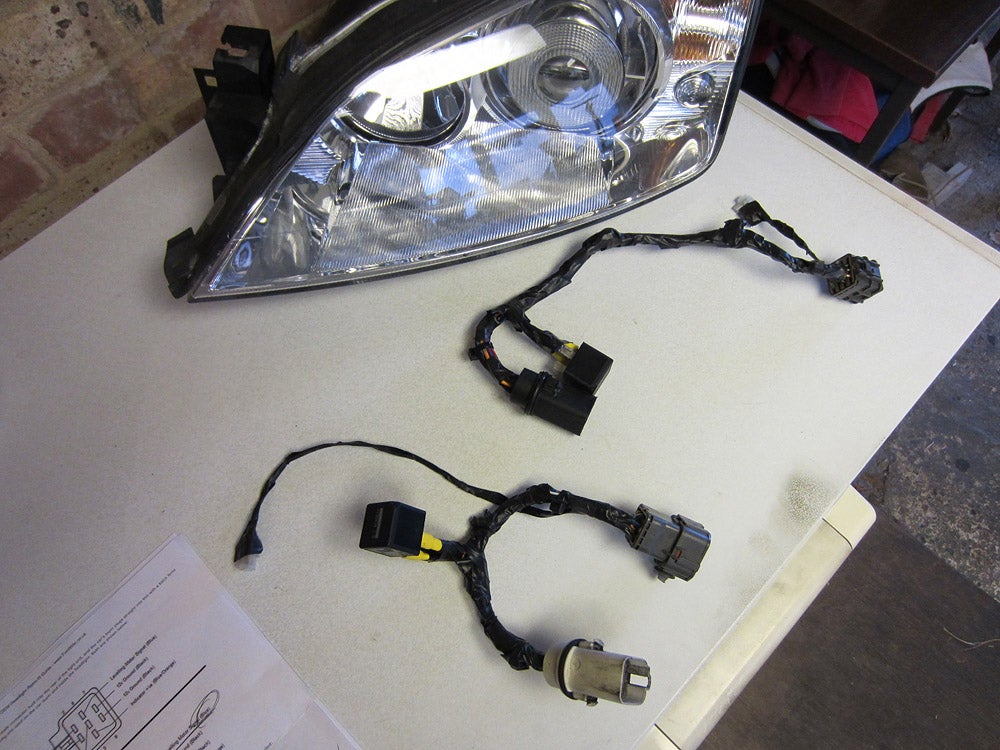
Creating the rest of the patch loom is simple, as explained above. I Used the wiring diagrams above to match up the Side-light, indicator, dipped (Xenon) and main beam positive leads from the 'xenon' side to the 'halogen' side of the loom... Like so:
You can see the cable with the terminal block attached which is the levelling signal feed.
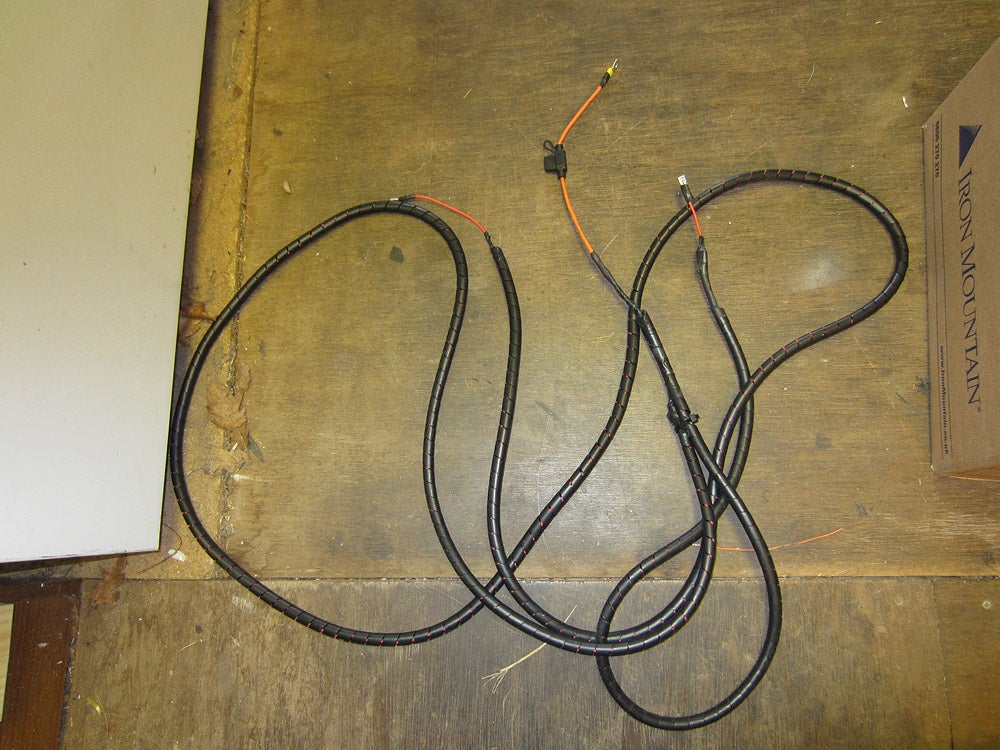
I have opted for the safest method of powering the ballasts, which is a separate fused feed from the battery feeding a relay for each headlamp. This is much more robust than using the car's existing wiring. The 'dipped positive' feed from the car's loom simply activates the relay.
So here are my looms, all made nice and neat and solid:
And here's my power cable - From the battery's positive terminal via an inline 20 amp fuse to each light. I wrapped each cable in plastic spiral-wrap so it won't chafe, and ran the power for the offside light around the back of the engine bay up against the bulkhead.
If anyone has any questions, criticisms or comments feel free to email me, howard[at]hcanning.co.uk.
 Your Privacy Choices