Registrations
We now manually approve all new user accounts due to a large influx of spam bots. Accounts are normally approved within 48 hours.
If you need any help with using this Wiki, please ask here: TalkFord.com Wiki Submission Forum
Auxiliary belt tensioner replacement
For more information, visit the Ford Mondeo forum on TalkFord.com, the definitive resource site covering all Fords from the present day to the 1970's.
|
Overview Guide | |
| Ford Model: | Mondeo Mk3 |
|---|---|
| Petrol/Diesel: | 1.8/2.0 petrol |
| Estimated Cost: | £100-150 |
| Difficulty? | low-medium |
| How long does this take? | 1-2 hours |
This applies to Mk3 Mondeo 1.8 and 2.0 petrol Duratecs only, and can also be used as a guide for changing or removing the belt without replacing the tensioner.
Gradual failure of the auxiliary belt tensioner on the Mk3 petrol is fairly common, causing a tinny rattle to the engine, particularly at, or slightly above, idle. It also causes superfluous vibration of the belt, which must accelerate wear of the components it drives: the water pump, A/C compressor, alternator and power steering pump.
If you think your tensioner is on the way out, listen carefully with the bonnet open, the engine cover removed and the engine running at idle. The aux belt is on the left hand side as you stand at the front of the car looking at the engine. Obviously, keep clothing and hair out of the way of the running belt! The alternator can be seen at the back of this side at the top - the tensioner is at the bottom of the engine directly below it. The Haynes manual is sadly quiet on replacement, so here's a quick guide.
If you have an early pre-facelift, built before 2003, make sure the rattle isn't coming from the inlet manifold.
Replacement is fairly easy despite the location, but the part isn't cheap. You may also want to replace the belt at the same time - the normal service interval is 150k miles or 10 years, so if you're close to this, do it. You need to partially remove the belt anyway, so replacement is little extra work, just extra cost.
This involves working on a jacked-up car and fiddling with bits that, if incorrectly replaced, could cause engine damage. If you're not comfortable with this, get a garage to do it for you.
Contents
Parts needed
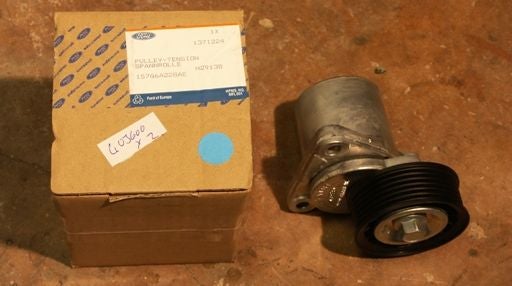
- New tensioner (FINIS 1371224, 1S7Q-6A228-A*) - about £120
- New belt if you choose to do this (FINIS 1120198, 1S7Q-6C301-A*) - about £20
Tools needed
- Wheelbrace & alloy wheel key if required
- Jack
- Axle stand (optional, but recommended)
- 8, 10 and 15mm sockets (you could get away with spanners for the 8 & 10mm)
- Torque wrench to do the job properly (only needed for tensioner replacement)
- Nylon strap with cleat fastener, or rope
Method
It's best to clean up as much as possible prior to starting work. Give the car a good wash, including the wheels and wheelarches.
Accessing the part
- Loosen the wheelnuts on the RH front roadwheel (driver's side on a RHD vehicle).
- Chock the rear wheels securely and ensure the handbrake is firmly on.
- Look up the jacking points - jack up the car under the sill point with the standard jack, unless you have a trolley jack to hand.
- Support the car on an axle stand at the front chassis rail point. You'll be pulling the car around - the standard jack isn't intended to hold the car stable for this level of work.
- Remove the wheelnuts and the wheel.
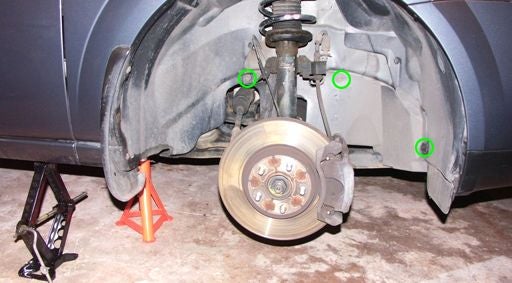
- Remove the one 8mm and two 10mm bolts from the lower front plastic cover - circled in green below.
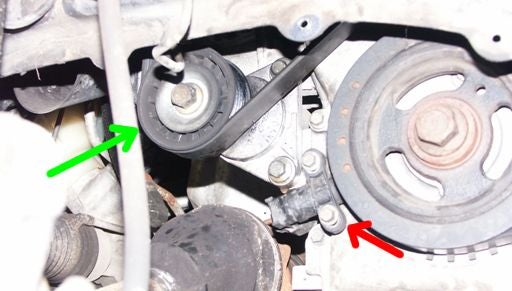
That should give you access to the tensioner, arrowed in green. When working, take care to avoid damaging the crankshaft position sensor (arrowed in red) and the brake line (partially obscuring the top of tensioner pulley).
Removal
- Using a 15mm socket on the tensioner pulley bolt, apply clockwise torque. This should work against the spring action of the tensioner, loosening the belt. Again, be very careful not to damage the brake pipe - or your knuckles on the sheet metal edge of the wheelarch. Pull the loose belt off the crankshaft pulley and release the tensioner pulley.
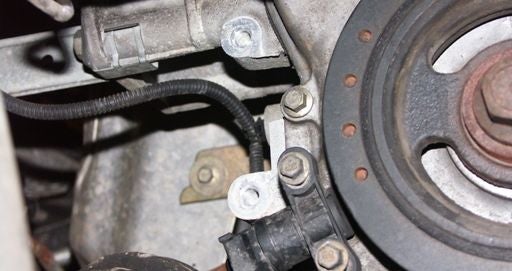
- Undo the two 10mm bolts holding the tensioner to the block and remove, keeping the bolts in a safe place as you'll be using these to hold the new tensioner on. If necessary, clean up the exposed mating face on the block:
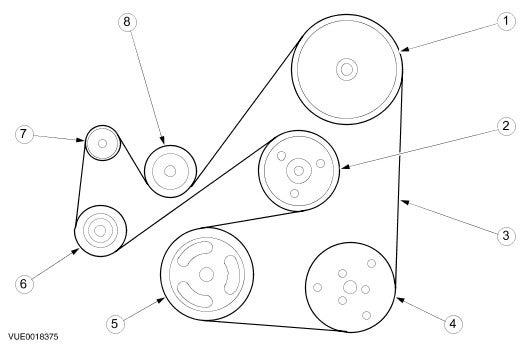
- If you're replacing the belt, remove the old one completely from the top of the engine. Here's the routing for reference:
- Power steering pump pulley
- Water pump pulley
- Accessory drive belt
- Air conditioning (AC) compressor pulley
- Crankshaft pulley
- Accessory drive belt tensioner pulley
- Alternator pulley
- Accessory drive belt idler pulley
Fitting
- Fit the new tensioner using the old unit's bolts. Tighten both bolts to "tweak-tight", then to a final torque of 25Nm.
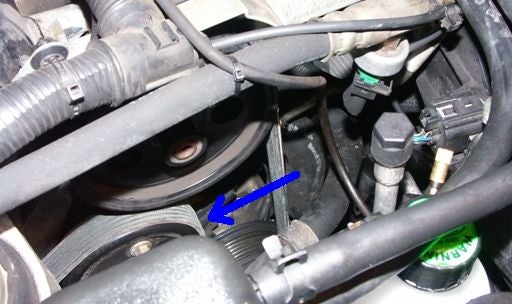
- Refit the belt (new one if appropriate), leaving it off the plain non-flanged water pump pulley arrowed in blue below (viewed from top of engine - don't look for the bottle at bottom right, as that's part of my LPG system). This is the easiest point to finish the belt fitment.
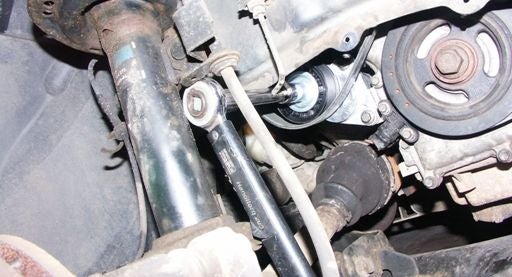
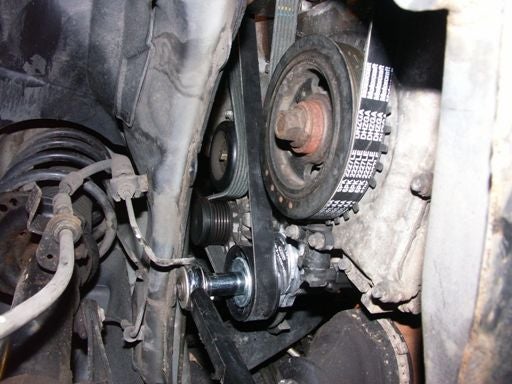
- Loosen the belt by using a 15mm socket on the new tensioner as above and push the belt over the plain pulley. You may find it easiest to tie the socket driver bar to the front hub carrier below the driveshaft to hold the tensioner "open" whilst fitting the belt from the top of the engine. I used a nylon strap with cleat to hold it in position.
- Release the tensioner and check the belt is correctly routed over all pulleys. Make sure the belt grooves are correctly located in the teeth of all the pulleys.
- Refit the wheel arch liner part. The 8mm screw goes at the front edge of the wheel arch.
- Carefully remove the axle stand.
- Refit the road wheel, partially tightening the nuts.
- Lower the car and fully tighten the wheel nuts (Wheel nut torques).
- Leave the engine cover off for the testing section.
Testing
Double-check belt routing, then very briefly run the engine. Ensure the belt is still in position, then run it for longer. Hopefully, your noise should have gone. If all is well, refit the engine cover. Don't forget to close the bonnet before driving off.
 Your Privacy Choices