Registrations
We now manually approve all new user accounts due to a large influx of spam bots. Accounts are normally approved within 48 hours.
If you need any help with using this Wiki, please ask here: TalkFord.com Wiki Submission Forum
Alarm - Making Louder
For more information, visit the Ford Mondeo forum on TalkFord.com, the definitive resource site covering all Fords from the present day to the 1970's.
|
Overview Guide | |
| Ford Model: | Mondeo |
|---|---|
| Petrol/Diesel: | ???? |
| Estimated Cost: | ???? |
| Difficulty? | ???? |
| How long does this take? | ???? |
Mk3 - Making The Alarm Louder
Background
Had the mod done to my mk3 as the standard alarm noise is somewhat puny. ( its not anymore )
Method
Here's a few piccies of what the sparkie did & where so that maybe a few more people can do this mod themselves.
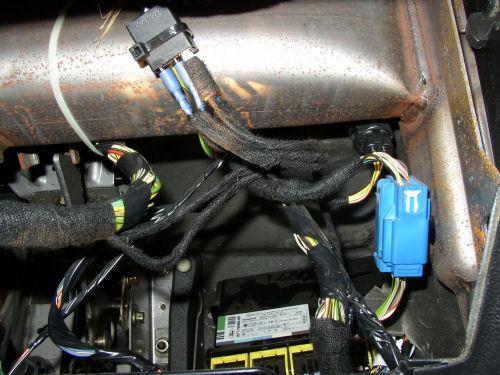
Pic 1 - just shows the relay and its wires
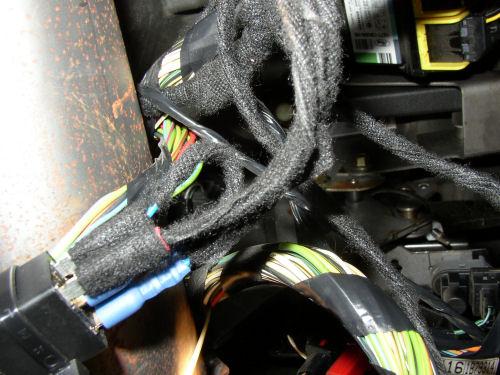
Pic 2 - is a close up of the relay showing a loop from one pin to another ( presumably its the ground wire)
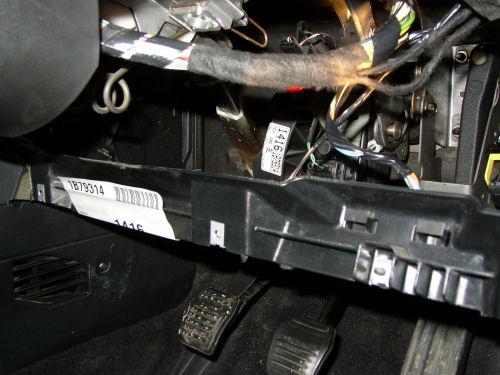
Pic 3 - Shows what bit of the loom the sparkie connected the horn wire & ground wire (i presume)
Loom Tape Removed
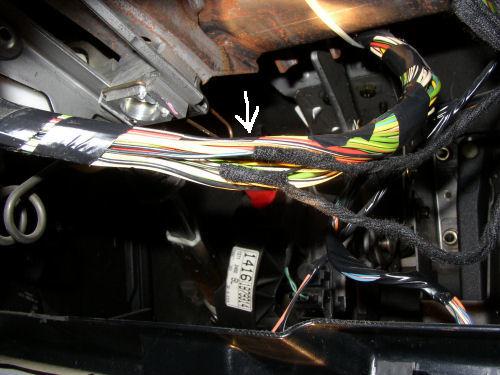
Pic 4 - is almost the same as pic 3 but the loom tape is now removed so you can see the wires the sparkie connected to. The one with the arrow going to it is the only one needed it is black with a blue trace ( its wire 4 of the coil spring if you want to trace it up that far to make sure ), the other wire can be connected to a suitable grounding point elsewhere ( its just the sparkie put it there )
Pic 5 - shows which bit of the alarm module he connected to for the siren feed but its in a difficult possition for me to mess with plus i am just to chicken to start messing around here so the boot maybe the better option here for connection.
Edited 28/06/08
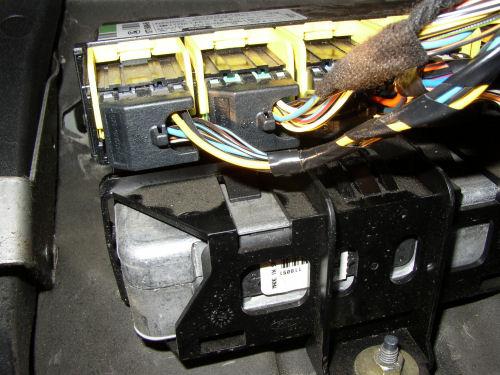
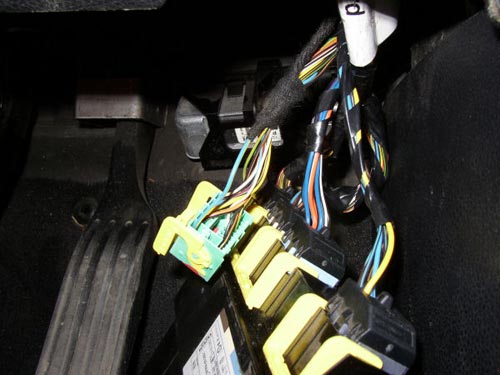
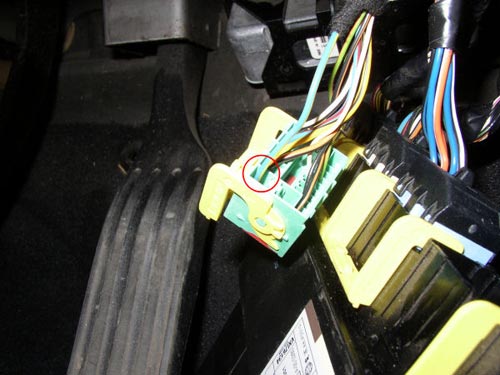
As you look at the c.e.m [central electric module] from under the steering wheel..look for the 2nd from the left module this is the one you need!!unlock the yellow tab and slide the module connector off.Mine is a 2006/56 and the wire is in fact blue with yellow trace(checked at horn end as no green/yell visible)splice this wire and join your alarm feed pole 85 on relay.
(If you do your folding mirror on lock/unlock at the same time,use the same earth off the cross member above the c.e.m and its real tidy with both relays on the same earth)
Pin 30 off your new relay runs to the black w/blue trace horn wire as in pic 4 above leaving pins 86 and 87 to earth..your bulkhead above the c.e.m.
Edit finished
Pic 6 - A large view of the connection & location
Pic 7 - A close up the connection wire & which bit of the plug it goes in
I hope this is of some help to others as its a very good mod as it makes tha alarm nice and loud now, so loud i dare not test it by opening the bonnet ( the horns in there so it is very loud ) I tested it though - with ear plugs in for safety
Submitted by compuwiz_uk
Alternative Method By Jonsen
Mk3 Making the Alarm Louder by Jonsen
1. Purchase the required materials. You will require
Approx 8M of wire (I did for my estate, have plenty to make sure)
Terminal Box connectors
SPST NO Relay - [1] – You want the one with part code N02AW - 40A SPNO Auto 12Vdc
Spade connectors (for connecting wires to the relay)
Screwdrivers to take trim apart / tighten terminal boxes
Wire cutters / strippers
Ford radio removal tools, you will also need to KNOW YOUR CODE before taking the radio out. If by any chance you do forget the code drop a penny into the cigarette lighter, get ford to replace the fuse for free then return the next day saying they broke your radio ;)
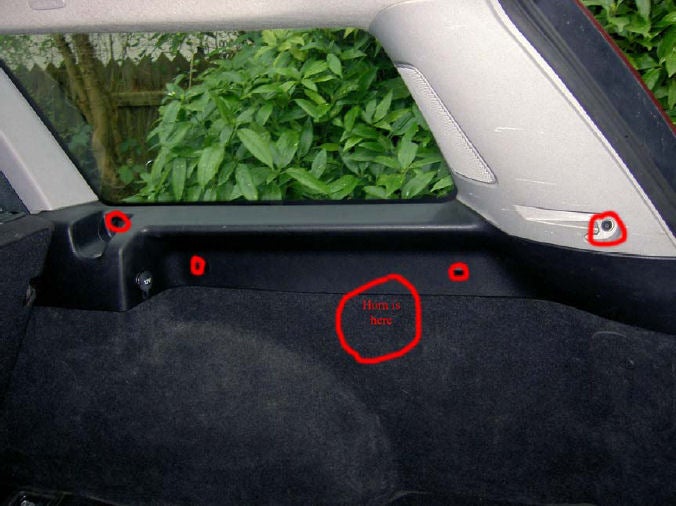
2. Locate the alarm horn, Estate - this is behind the carpet on the drivers side of the car at the back around 30cm forwards from the very rear of the car. Saloon/Hatch - its on the passenger side of the boot but around the same general location as the estate. Take plastic trim off by loosening screws highlighted in picture and pull the carpet away gently. You should now be able to see the alarm horn grounding point and wire going to the horn, you can feel round the back for the horn just to make sure. Picture below shows horn location and the screws you need to remove on the estate.
3. Splice into the horn wire, it should be fairly obvious which wire it is as there is only one wire going to the horn. The wire is Green with a Yellow stripe. You should now have the original alarm horn still connected and a new wire coming from it. Do NOT cut this wire, it needs to be run all the way to the front of the car!
4. Run the wire down the car, should be fairly obvious how to do this. The wire needs to terminate just behind the radio. I found it easier to wire it down the passenger side as I already had wires there and there is no complications with moving parts however it is up to you where you wire it, just make sure it ends up behind the radio. As you are laying the cable re-assemble the rear of the car.
5. I put my relay in the well behind the radio as there is plenty of space behind the radio for this. Wire the relay as follows
Pin 85 – Connect the wire you took from the alarm horn in the rear of the car to this.
Pins 86 and 87 – Ground using a suitable point, I chose the radio ground which is pin 6 on the radio connector. Cable is thicker than the others and is a black / green colour.
Pin 30 – Leave unconnected for now.
6. Remove the cover just under the steering wheel by removing the screws. You will have to pull down the secondary glove box (as I call it) to access the two screws behind it. To remove the cover it will require a bit of tugging but it will come as there is a clip holding it on the top left.
7. Locate the wires coming down from the clockspring. You will have to remove some of the insulating tape holding the wires together. The wire you are looking for is the Black with a Blue stripe. Be very careful that you DO NOT mix this up with the Black with a Green Stripe. They look VERY similar. Double check before doing anything. Pictures courtesy of CompuwizUK. Pictures show the group of wires you are looking for with insulating tape on and off.
8. Once you have located the Black with a Blue stripe wire take a splice from it. I did this by cutting it and then connecting it again using the terminal boxes and adding an extra wire to one side of the terminal boxes.
9. Connect this wire to Pin 30 on the relay. Now double check your relay connections. Pin 86 and 87 should both be going to a suitable grounding point, pin 85 should be the wire coming from the existing alarm horn and pin 30 should be coming from the Black / Blue stripe wire you just took a splice from.
10. If all is ok give it a test. Do this by opening the driver’s door window, locking the car, waiting two minutes then opening the driver’s door from the inside.
Both horns should be now sounding and you should be able to notice the difference in the sound. Stop the alarm by pressing the unlock button on the remote. Put the radio back in and re-assemble the car.
Congratulations, the alarm mod is now complete!
 Your Privacy Choices